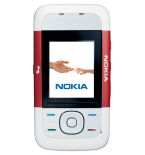
Backup contactos, calendário, tareas, notas and call logs from Nokia 5200

Available guides for synchronization to the secure cloud
Supported functions
- contact synchronization
- calendar synchronization
- task synchronization
- note synchronization
- call log backup
Nokia 5200 is supported on PhoneCopy. Please note that following settings may vary a little depending on the firmware version.
Confirmed models
Confirmed versions
News
- 27/1/22
- A new phone user has synchronized his contactos to PhoneCopy from Iran.
Nokia 5200 users around the world
Nokia 5200 is often used by PhoneCopy users in countries like Iran (Īrān, ایران) - 100.00%.
On the map
Following heat map shows contacts synchronisations with Nokia 5200 using PhoneCopy across the globe.
Text guideline - How to backup
With Nokia 5200
Las instrucciones no han sido trducidas a su lengua.
- Press Menu and choose Settings - Configuration - Personal config. sett..
- Press Options and choose Add new - Synchronization and configure given fields.
▼ hide fields
- Account name: Write PhoneCopy
- Server address: Write http://www.phonecopy.com/sync
- User name: your_username
- Password: your_password
- Contacts database:
- Database address
- Write contacts
- User name
- Leave empty.
- Password
- Leave empty.
- Calendar database:
- Database address
- Write calendar
- User name
- Leave empty.
- Password
- Leave empty.
- Notes database:
- Database address
- Write notes
- User name
- Leave empty.
- Password
- Leave empty.
- Use pref. access pt.: If you want to use your preferred access point to connect to PhoneCopy, choose Yes, otherwise choose No and set up the access point in the next menu item Access point settings.
- Press Back, go to the name of the profile you have just created, press Options and choose Activate.
- Press Back twice.
- Choose Connectivity - Data transfer and go to Server sync but do not enter this item.
- Press Options - Edit - Sync settings and configure given fields.
▼ hide fields
- Configuration: Choose Personal config. - Select.
- Account: Choose Phonecopy - Select.
- User name: Fill in your user name.
- Password: Fill in your password.
- Press Back and choose Synchronized data.
- Mark the items you want to synchronize and press Done (or Back if you made no changes).
- If the cell phone asks you Save changes?, choose Yes.
- Press Done (or Back).
- Choose Server sync. Now you can start synchronizing with PhoneCopy.
If you need more help with the settings, visit our step by step screenshot guide.
Por favor, ahora asigne su teléfono a su cuenta PhoneCopy.
En el caso de problemas con la sincronización, contacte con nosotros.

